Friday

Giveaway Weekend!! Just Released "MockingJay" by Suzanne Collins

You all know that I love the Hunger Games Trilogy by Suzanne Collins, and you all know that I love my readers!! So as a big thank-you for all your comments and support, I am giving away a brand-new copy of the last book in the trilogy, "MockingJay".  
 Giveaway starts NOW and ends on Sunday, August 29 at 10 pm EST.  Have fun, and good luck to you, my friends!


 To enter to win you need to:
(leave a separate comment for each entry)


1. Visit my Etsy shop or www.shadowcase.com and tell me which ShadowCase is your favorite. (Click on my sidebar link or "visit our shop")

If you want extra entries you can do any or all of the following:
2. Tell me what you would want to put in a ShadowCase
3.  Give me a suggestion for another color/style of ShadowCase you would like to see in the shop
4. Become a Facebook fan (Just click on my sidebar link)

(I will choose the winner using a random number generator.)

Let the games begin!

Wednesday

Friendly Features: Emily at JanDee Crafts

I love the blogging world because of all the creativity floating around--I look forward to waking up every day, just to see what new and exciting things are being thought up by fantastically inspiring women. (Yes, I know.  Sad, but true!)

So in the spirit of support and love for all of you out there in Blogland, I'm going to be featuring a different creative lady every week.  Let me introduce you to one of my new favorite blogging friends--if you haven't met her yet, jump on over and pay her a visit.  Emily from JanDee Crafts has so much personality, and some really fun ideas on her blog. 


One of my favorites is this Blue Plate Special which works great as an easy gift--Christmas is going to be a breeze this year with all the ideas she's got for gifts!  Emily has a really cute poem to go along with it, too. Find it HERE.  

 I'd love to feature more of you wonderful women and your projects, just drop me an email at janna@shadowcase.com and let me know!  Have a fabulous day!

Monday

Mmm-Mmm Monday: Easy Toffee Treat

Hi my friends! Sorry I'm a little late today--just trying to get in those last magical memories of summer before the kiddos go back to school this week!
And now onto the sugar rush....I first had these yummy treats about a decade ago at my sister-in-law's house.  I was thrilled last week when I saw the recipe posted on C.R.A.F.T.  A perfect recipe to do with kiddos, I had to try it!  It is so simple to do, and takes just a few minutes to bake.

Ingredients
4 ounces saltine crackers
1 cup butter
1 cup dark brown sugar
1 cup semisweet chocolate chips
1 cup white chocolate chips
1 cup toffee chips

Melt butter and brown sugar together in saucepan. Bring to boil, then boil for 3 minutes.
Pour butter mixture over saltines that are laid out on cookie sheet. Spread evenly over crackers.


Bake at 400 degrees for 5-6 minutes.

Sprinkle chocolate chips over crackers and let sit for 5 minutes.  Spread over crackers and swirl a little, just for fun!


Sprinkle toffee pieces over the chocolate.
Refrigerate for about 30 minutes, then break up into pieces.  
I think I gained 5 pounds last week from the chocolate-toffee-buttery-goodness.  Gonna have to run a few extra miles this week to make up for it!

Wednesday

Dressing-up Dry Erase Markers

Hello my friends!  Some of you may know that I am a person obsessed with list-making.  The more hectic my life, the more lists you will find spread all over the house.  Which is why I LOVE, love, LOVE dry-erase boards.  They are one of many ways to make a task list look creative and fun, thus motivating me to actually do the things numbered on the list.  However, I am fed up with the ugly markers that are always attached to the side of my adorable-crafty-dry-erase-board.  So here's my easy solution...
 Dress-Up that Oh-So-Very-Unstylish Marker
Materials Needed:
Dry Erase Markers
Fabric Scraps
Mod Podge
Glue Gun

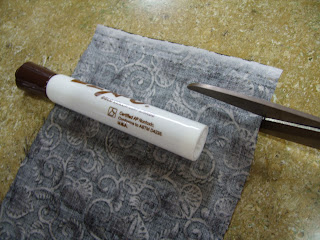
Cut out a piece of fabric about 3" X 3" around your marker.

Spread some Mod Podge on the fabric and wrap around the marker.

Add another layer of Mod Podge over the top to secure the seam and keep it from fraying.

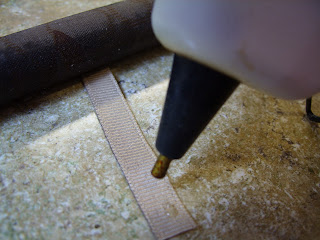
Add a little bit of ribbon...

A glue gun works well for attaching any embellishments.

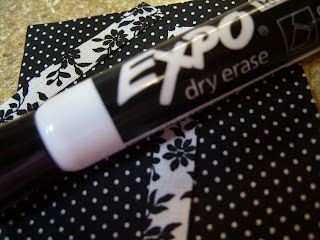
Go crazy and dress-up all the dry erase markers in your house!


I love the way these turned out, and it's a quick 5-minute project. I'm planning to also do some of these with my kids as teacher gifts this year--wouldn't that be cute??

Monday

Mmm-Mmm Monday: Wacky Watermelon

Did you know that August 3rd was National Watermelon Day?  I guess I missed the "watermelon boat" on that one this year!!  But designated day or not, we are always watermelon fiends at my house, and we eat it several times a week during the summer. 


One summer day I thought, let's get a little wacky with it and cut some up with cookie cutters.  Let me tell you, it is so much faster to make watermelon cookies than sugar cookies, there is a lot less mess, and it is still super fun for the kiddos!  Here's what we tried this time....


While we were eating, one of my kids said, "Hey, Mom, these are really cool.  You should put them on your blog!"  Children don't miss much, do they?

Saturday

A Legacy of Honor

I was touched by this ShadowCase designed by Alish at Sisters Stuff (I love, love, love her blog!).  What an awesome way to show love and support to the brave men and women that sacrifice so much to serve our country.  This is what she had to say about her recent ShadowCase project....
I just love this Shadow Case that I made for my husband. It is such a great place to house his Army memorabilia and is a great reminder of his service to our country. It was so fun to put together and is a great quality product. Thanks Shadow Case!

It looks great, Alish!  Thanks so much for taking the time to share it with us!

Wednesday

ShadowCase Spotlight and Giveaway!!

Sorry, this Giveaway is now closed.  Thanks to all who participated!
Fabulous News My Dear Friends!  
Mique from 30 Days (one of my favorite blogs) is spotlighting my company, "ShadowCase" today.  What a gorgeous display she did with her daughter's blessing dress--it just melted my heart.  I adore the added touch of the vinyl lettering--so elegant!
 That was the news, here's the fabulous!
She also happens to be running a GIVEAWAY (woo-hoo!) for your very own, completely free of charge, ShadowCase Designer Kit.   (I love you ladies so much, I even throw in the shipping cost.  Don't tell my hubby!) 

The giveaway is open from now until August 15th, so click HERE to get on over there to 30 Days and put your name in the drawing.  It is so easy to enter, I can't think of any possible reason why you wouldn't want to!

I wish you all the best of luck!

Tuesday

Horsey-Lovin' Hair Accessory Organizer...

For several months now, I've been wanting to get my girls' hair accessories in order, but could never seem to find the time.  Now that school is starting in a few weeks, I figured it was time to get down to crafty-business!  We had so much fun making it together, and I feel like it represents their personalities and something they 
really. truly. LOVE--
 HORSES!!


 Hair Accessory Organizer
 
You will need:
1. Canvas board (I got mine at Walmart for about $5)
2. Cute Fabric (fabric is mandatory, cuteness level is relevant)
3. Coordinating Ribbons (3-5, depending on the width) 
4. Brads
5. Hot Glue Gun

 Lay your canvas board over the fabric and cut around, leaving about an inch for wrapping around the wood frame.


Wrap the fabric around and glue down to the wood.

Layout and cut your ribbons, again leaving a inch or so on the ends for wrapping around. 

I put a brad near the ends so that it created a little loop to thread headbands through.

Glue ribbons to back of frame, then trim off with scissors.  ('Course you can skip this step, because no one will see the back!)

Glue some ribbon to the back, tie a bow, and hang it up!


Now when we're in the mad rush getting ready for school, I don't have to waste time searching all over the house for something to put in my girls' hair. I love that they can see them and easily choose which one they want to wear that day. Every minute saved in the morning really counts in our hair-brained house!


Monday

Phil the Crockpot Goes on Safari

Phil has been out of the country the last few weeks (I've missed you!), and is back today to bring you Mmm-Mmm Mondays with an African flavor.  After going on safari in Kruger National Park last week, he took a drive through some of the native townships in South Africa and tasted his first curry dish.  Of course, now he wants to share a little bit of that spice with you (although a much milder form--this one won't make your eyes water unless you want it to!)

African Beef Curry
2 lbs. ground beef, browned
2 onions, diced
2 green peppers, diced
2 15 oz. cans diced tomatoes
2 apples, peeled, cored, and diced
2-4 tsp. curry (or more to taste)
6 c. prepared rice

Add all ingredients except rice in slow cooker and mix well.  Cover and cook on high 4-6 hours, then serve over hot prepared rice. 

My family shocked and surprised me by loving this  (even my picky 3-yr-old complimented me!), so I have doubled the recipe for all of you.  I plan to do this the next time I cook this one up!

Friday

Book Review: The Hunger Games

Hi everyone!
Sorry things have been a little quiet around here lately! I was out of town last week getting a little R&R with my hubby (and no kids, hallelujah!).  Not only did I gain 5 annoying pounds while vacationing, I also had a little time to READ!  Amazing! Since I started my little ShadowCase business, reading a good book is a thing of the past it seems. 


Even though I might be a little behind the times on this book, if you haven't read it yet, get to your local library or borrow it from a friend--buy it if you have to!

I'm not a big fan of sci-fi or futuristic/end-of-the-world novels, but "The Hunger Games" by Suzanne Collins was one I just couldn't put down.  In fact, I stayed up almost until dawn, turning page after page, so that I could find out what happens in the end. Now I can't wait to get my hands on the sequel, "Catching Fire". 

If any of you have read it, I'd love to hear what you think about it!

Monday

Mmm-Mmm Monday: Fiesta Pasta Salad

Meet Jessica from one of my new favorite blogs "Or So She Says".  She made this FABULOUS pasta salad that not only looks festive, it's a party in your mouth! 

It's on my menu for dinner tonight.... care to join us?


Fabulous Fiesta Pasta Salad

The ingredients for the salad: bow tie pasta,cherry tomatoes, olives, shoe peg corn, black beans, green onion and green pepper. (This is great with chicken too!)


The ingredients for the dressing: white vinegar, vegetable oil, taco seasoning and ranch dressing.


While the pasta is cooking, chop up all your pretty vegetables.


When the pasta has cooked, let it cool for about 20 minutes, then add all the vegetables,


and the corn and black beans.


Mix together the white vinegar, vegetable oil and taco seasoning.


Then add the ranch dressing. (However much you'd like)


Mix together and add to the pasta salad.


Fiesta Pasta Salad
Ingredients
10 oz bow tie pasta
1 can black beans
1 can corn ( I prefer shoe peg)
1 1/2 cup cherry tomatoes
green onion
green pepper
(4 ck breasts)

Dressing
1/2 cup oil
1/2 cup white vinegar
1pkg. taco seasoning
ranch dressing (about 1/4 cup)

Directions
Cook the pasta until al dente. Chop up all the veggies. Mix together the dressing. Add as much ranch dressing as you like to the dressing- I did about 1/4 cup. Add the veggies, corn and beans to the pasta. Add the dressing and mix everything together. It's even better the next day!
Photobucket